As a beginner we search for “what is firebase?” and we get the definition as “Firebase is Google’s mobile application development platform that helps you build, grow, and improve your app.”, but what does it actually mean? In short with firebase you can work without any backend server, as firebase offers you a Real-Time Database you can store your data in a firebase real time database. It stores the data in JSON(JavaScript Object Notation). Firebase is Baas (Back end as a service).
Firebase offers so many features to grow and improve your application. Features such as
To utilize this feature in your React Native Application you have to integrate Firebase in your app. So in this article lets see how to integrate Firebase in your React Native application.
Installation
First, navigate to your React Native application root directory in your terminal and run the following command
Using npm:
npm i --save @react-native-firebase/app
Using yarn:
yarn add @react-native-firebase/app
Firebase Setup
Go to Google Firebase website, sign in and Go to console which you can see in the top right corner. You will see the screen below. Now click on Create a project button.
Once you click on the create project button you will see a screen where you have to start with the name of your project as shown below. Enter your project name and click on the Continue button.
Second step is Google Analytics for your Firebase project. Enable Google Analytics for this project and then click on the Continue button to navigate to the third step.
What are the benefits of enabling Google Analytics for your Firebase project?
Google Analytics helps you monitor your application success. It is a free app performance measurement solution. With google analytics, you can analyze actions taken by the users in your application. Once you enable this google analytics you can monitor how your app users fulfill the actions and you can understand the behavior of the users. Understanding the behavior you can develop an application that is more functional for the users.
Third step is to Configure Google Analytics. Select the location and check the checkboxes. Now click on the Create Project button.
Your project is ready on the firebase console, click on the Continue button and you will see the dashboard as below
Setting Android app
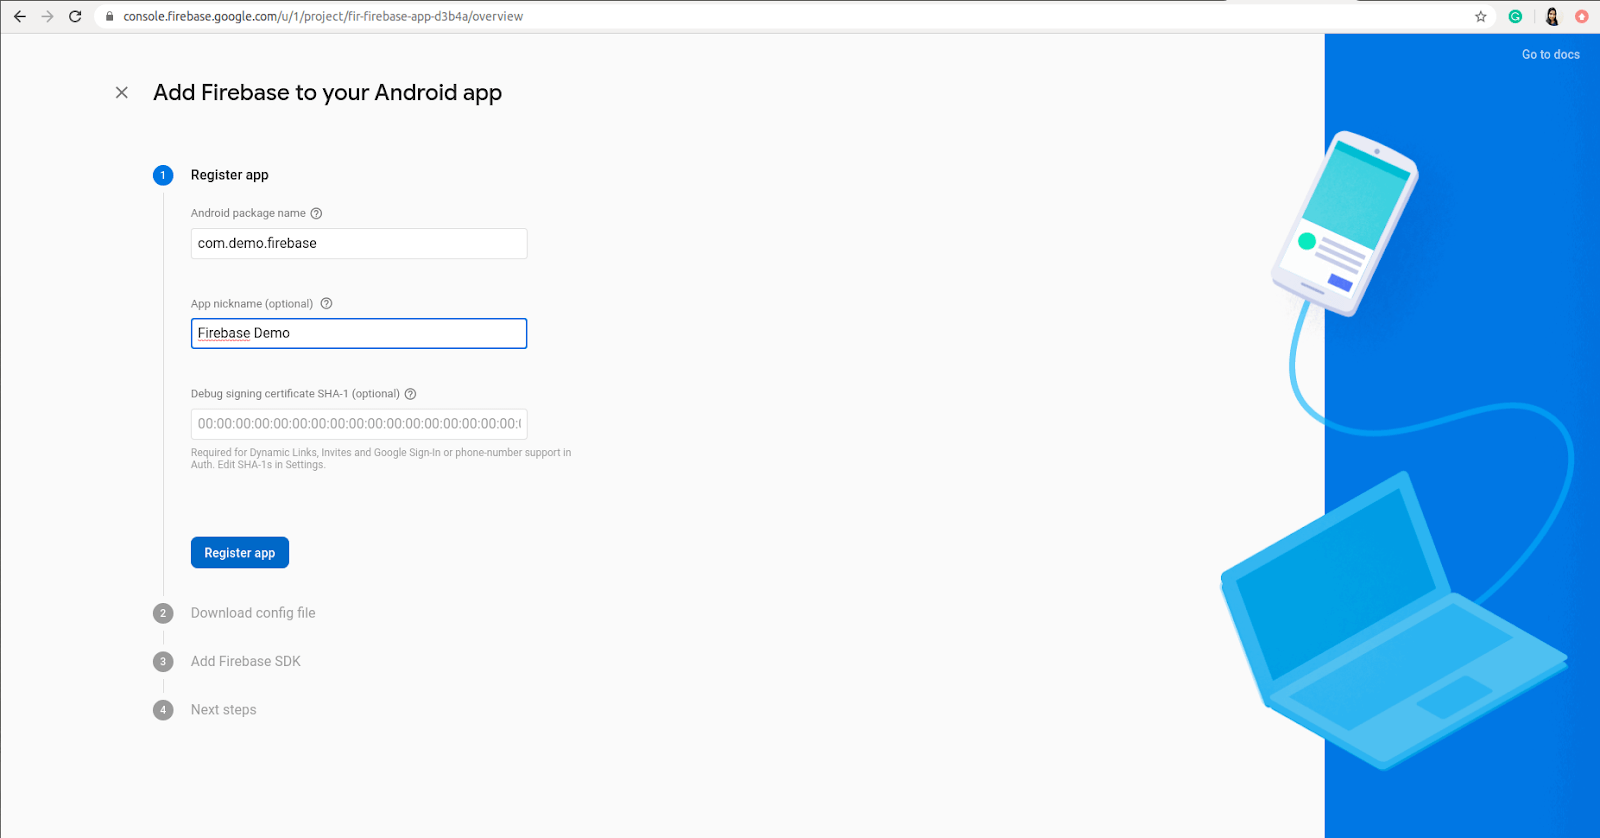
To set up your android app clicks on the android icon. It will navigate to the Add Firebase to your Android app.
1. Enter your android package name for example (com.demo.firebase). Your Android package name must match with your React Native app package name which you can get in …/android/app/src/main/AndroidManifest.xml file. You can use any app nickname of your choice and click on the Register button.
Note: If you are using firebase for CI/CD(Continuous Integration and Continuous Delivery) setup then you have to create three different firebase projects(development, staging, and production) for a single React Native application. In this case, you have to use a different package name for three different firebase projects of the same React Native app. For example com.appname.dev, com.appname.staging and com.appname.release.
How to get a SHA-1 certificate?
Though SHA-1 key is optional we will see how to get a SHA-1 key
- Open Android Studio
- Open your project
- Click on Gradle (From Right Side Panel, you will see Gradle Bar)
- Click on your project >>> Tasks >>> android >>> double click on signinReport
- You will see SHA-1 key in Run Bar

2. Step two is Download config file. Click on Download google-services.json button and place the file in your android app folder (../android/app/google-services.json) and click on the next button.
Note: Please check the name of your google-services.json file sometimes if you download it more than one time it can be google-services (1).json. You have to rename it with google-services.json.
3. Now Add Firebase SDK
- Go to …/android/build.gradle
buildscript {

   repositories {

       google() //Add this line

       jcenter()

   }

   dependencies {

       ...

       classpath("com.google.gms:google-services:4.3.4")

       //Add this line

       }

}

allprojects {

   repositories {

       ...

       google() //Add this line

       ...

   }

}
- Go to …/android/app/build.gradle
apply plugin: "com.android.application"

// Add this line

apply plugin: "com.google.gms.google-services"

// Add this line

dependencies {

   implementation     platform('com.google.firebase:firebase-bom:26.1.1')

   // Add this line and change the version with the latest one

   implementation "com.google.firebase:firebase-analytics"

   //Add this line

}
Sync your project aftering adding this line in your project and click on the Next button.
- Click on Continue to the console
With this, you have successfully added your android app in the firebase console. We can see we have set up an android app firebase-demo in our firebase console.
Conclusion
In this article, we saw how to integrate the firebase in your Hire React Native developer to add an android app in your firebase console. With this, you are now able to use all the features provided by firebase in your android application. As we saw SHA-1 key is optional in the setup but it is required for Dynamic linking, Invites, and Phone Authentication.


.png)
.png)
Comments
Post a Comment